Pages

Monday, December 29, 2014

Cookie Carrier, Casserole Carrier, Carry Anything!

Happy New Year!  Maybe you decided now is the time to get crafty?  This is a repost of one of my most repinned pins on Pinterest.  It is super easy to make and so darn cute.  It makes me want to get upstairs and start pinning something together!  I hope you have (or had) a happy New Year, and come back for cookies, recipes, party ideas and other good stuff.  2015 is my year to write.  A play (another on stage I hope), a revision of a family cookbook, some great blogs, and who knows what else!

Call it what you like, but call it cute!
I had my sister here for a week, and we did all sorts of fun projects.  Of course, since she is the brain child of Hipline Media, we had to sew.  She brought an idea she made with her ASG (American Sewing Guild) group and everyone loved it.  It is a tutorial video,  from a really talented sewer, The Crafty Gemini.    It is officially called a Casserole Carrier, but I don't make casseroles, just not a fan.  But you could carry anything in this.


The first carrier I made was with this great flatware fabric with a bright orange interior.

I lined this one with the heat resistant Insul Bright.  This stuff is a little stiff, but is designed to absorb heat, and easily found at the fabric store. It would be ideal for taking a dish to a potluck.  We thought they could be really fun in school colors to take to a tail gate.

This carrier will definitely be used for the hot things. The Insul Bright makes this one a little thicker, and I am anxious to make a few pot holders with the Insul Bright too, I'l let you know how that goes. I am always on the look out for a good potholder!


The second carrier I made I used 100% cotton batting inside, like you would use for quilting.  This is thinner, and it won't really protect from or insulate heat, but I thought this would be a great cookie or dessert carrier. My covered pie dish fits perfectly (but who has time to make a pie when there's cookies to frost!)   I love the fabric, it reminds me of the discs we put inside a 45 record to play it on the stereo spindle.


If you are interested in making these, it will take you less than an hour, uses less than a yard of each fabric, and requires no special sewing skill, honest.  If you're looking for more challenging sewing, or instruction, check out our Etsy store of the Hipline Media products.  So, what are you waiting for?  Get in there and sew!

Thursday, December 18, 2014

Not Ugly Christmas Sweaters


Ugly? No! Tacky? Maybe!  Cute?  Yes!!
  I wish someone would invite me to an ugly Christmas sweater party.  Or tacky, as they are often called.  Back in the early 90's, there was a high end boutique that sold the most adorned Christmas sweaters ever, and I was lured in year after year.  I would cringe with embarrassment if you knew how much I paid for them!  But, as a true daughter of Pasquale, I have saved every one of them.  I need an occasion where it would be acceptable to wear them once again. But, there are plenty of these parties happening, and I am just making their cookies!


I wouldn't call these necessarily ugly or tacky, but pretty darn cute, if I may.  So, what are you waiting for?  Get those sweaters out of mothballs and party!

Monday, December 1, 2014

Ho Ho Ho, Here We Go!

I love the holidays!!!  And I love to make cookies for them as well. I try to choose a theme and maybe a half dozen cutters and use those throughout the holiday.  When you are sitting on a bin of about 75 holiday cutters, it can get overwhelming very fast!  So I thought I would revisit some of the old designs, and maybe in the process be inspired for this year!

Santa is made from a pumpkin cutter...

This adorable guy is a gingerbread man, upside down!

Simple snow theme, love polka dots!

The mittens are great for parties, not too childish!

Love these together...

Place cards for the table.

Favors for a party.

Platters are my favorite!

Nice assortment...

Did I make all these cookies????

Decided I am not a fan of blue at Christmas...

Not crazy about the pink either...
So, now I have to start a little sketching and see what the season brings....stay tuned!  What are you waiting for?  Get in there and bake!

Tuesday, November 11, 2014

Splattered Acorn Cookies


These are some of my favorite Thanksgiving cookies.  I love the simplicity of the acorn, and the rustic look of the copper splatter. All on a chocolate cookie base!  What's not to love!  
Prior to these, I made another Acorn Cookies that I was pretty proud of.  I thought they were cool with that Disco Dust on them.   A few years back when I first made the splatter cookies, I had read this post  Splatter Acorn Cookies from Sweet Sugarbelle.  She made some splatter autumn cookies, and I knew I had to go there.  As a kid, I can remember the blue splattered tin dishes we used in the summer around the pool.  I knew I wanted to splatter my cool, Disco Dust acorns.

The old acorns. They were cute.

These acorns are a little more special!


I started with chocolate cookies, and you may already know that I use LilaLoa's chocolate cookie recipe. It never fails and is delicious.  Of course I am a cocoa snob and use only Pernigotti.  When it came time to ice the cookies, I took my standard Royal Icing (really, it is nothing special, no secret, read the can for directions), and added a little snooty vanilla and more Pernigotti.  Then I thinned it to the right consistency and made it brown.  It tastes delicious!  I piped the borders and flooded only the bottom half and let them dry.


Once they dried, I mixed up some copper Luster Dust and vodka to the right splattering consistency and using a larger paintbrush, I splattered it on.  I used a large coffee filter as my paint area, and I have to say it worked pretty well.

Splattering area


I made a few extra cookies so I could experiment on the flinging method, the sprinkling method or whatever.  Find what works for you.  After I splattered them all and cleaned up the splatters everywhere else in my kitchen, I flooded the tops of the acorns and using another coffee filter cut in half as a shield, I dusted the tops with Disco Dust.  I think they are pretty stunning.  Such gorgeous colors and delicious too!  So, what are you waiting for?  Get in there and bake!

Friday, October 10, 2014

Pumpkin Chocolate Chip Muffins


Fall in a muffin cup...

Ahhhh, there are certain rituals of the seasons.

The winter is all about hot chocolate, red wine, slow cooking, chili on a snowy day.

Spring is asparagus, strawberry pie, and lemon poppy seed quick bread.

Summer is lemonade (with a little Absolut Citron), watermelon, anything grilled.

And fall is mulling spices, cider, butternut squash and pumpkin anything. But at my house, it is pumpkin muffins. Dense, fragrant with cinnamon, nutmeg, allspice, yummy pumpkin and studded with chocolate. They are especially good cold. Straight from the fridge or a few minutes out of the freezer. A cup of coffee or a glass of milk. I prefer them over pumpkin bread, pumpkin pie, pretty much pumpkin anything. You'll agree. It is a great combination and tastes just like fall....


Pumpkin Chocolate Chip Muffins
1 2/3 cups flour
1 cup sugar
1 Tablespoon cinnamon
1/4 teaspoon nutmeg
1/4 teaspoon allspice
1 teaspoon baking soda
1/4 teaspoon baking powder
1/4 teaspoon salt
2 large eggs
1 cup pumpkin (half a can, although I have dumped the whole thing in before)
1 stick unsalted butter, melted
1 cup chocolate chips
Preheat oven to 350. Mix flour, sugar, spices, baking soda, baking powder and salt in a large bowl.
Break eggs in another bowl and whisk in pumpkin and butter. Fold into dry ingredients, don't over mix. Add chocolate chips.
Scoop batter into muffin tin lined with papers. 12 regular sized or 24 mini muffins. Bake until puffed and springy but no longer gooey. About 20 minutes. Cool completely before storing.

So, what are you waiting for?  Get in there and bake!


Thursday, September 25, 2014

The World's Most Amazing Chocolate Biscotti with Walnuts and Chocolate Chunks


Perfect to dunk...


Grandma and Sookie.  

My mom is a brown noser. Yep, I said it. In her late 60's, (not the 1960's) she went back to college to get her BA in Creative Writing. And you know how parents always tell their kids to engage their professors, make sure they know your name, go visit them during office hours? Well she took it a step further. She would bake cookies for her teachers. So these poor unassuming college professors are there to critique her plays and essays and they are derailed by the wafts of Pernigotti Cocoa and Madagascar Vanilla, toasted almonds and walnuts.

Are you surprised she was an A student? Teachers everywhere wish they were lucky enough to have a student like her! Of course, I may be exaggerating a little as she is a published author and a playwright lucky enough to have seen about 7 plays produced on stage. She walked across the stage at the Tropicana Dome to receive that diploma right at her 70th birthday!

She has an on going eye problem that frankly hasn't slowed her down a bit, but is the elephant in the room, so to speak. Her specialist for her eye problem is an amazing physician. I have accompanied her on more than one occasion and love, love, love this man! He has the bedside manner a patient could only dream of their physician having, he is engaging and spends a great amount of time covering her concerns. Although she is regular in his office, he never treats her appointments as routine. And he looks like he jumped off the pages of GQ. The man can flat out dress, all the way down to the ink pen. (I covet things like ink pens).


no nuts in these

So one day, she decides to bring the nice doctor some chocolate biscotti. It seems that the perfect doctor maybe isn't so keen on sharing. This happens when grown men are given possession of chocolate cookies, homemade, in the presence of a multitude of women. He just didn't want to start a cat fight with my mom's biscotti. I think it was pretty smart of him personally. But oh, now that he's had a taste of them, don't you know he wants more! So she went back this week, biscotti in tow. And the relief of the doctor, she told him she baked another batch for his staff! Whew! No more sneaking the cookies around.

And here is the recipe. Seriously worth hiding from others. But the caveat. Don't even bother making these with grocery cocoa or grocery vanilla. They would never pass the test. My Williams Sonoma may have shuttered its door,  but the vanilla can be found many places.  The Pernigotti Cocoa may be a bit tougher to find.  And when it comes to toasting your nuts, trust me.  Toasting stovetop in a pan is the trick.  If you're like me, you are doing a dozen things at one time, and the nuts toasting in the oven are forgotten...until you smell them.  Then, it's too late!  So, get the ovens preheated. We're baking biscotti!


Chocolate Biscotti

Combine and set aside, sifting is always a good idea...
4 1/2 C flour
2 tea. baking powder
1 tea. salt
1/2 c Pernigotti Cocoa (Williams Sonoma)

3/4 cup chopped, toasted walnuts
3/4 cup chocolate chunks

Cream:
3 C sugar
2 sticks unsalted butter (room temp),
4 large eggs, (room temp)
3 tea. Madagascar vanilla (Williams Sonoma)

Cream the wet ingredients until fully mixed.  Add the dry ingredients slowly and mix until no dry spots are found.  Add in chocolate and walnuts. You can add espresso powder for a mocha taste, almond extract if you like that flavor. It is a great cookie to try new ideas with!


On parchment paper on baking sheet, shape into 2 logs, 2 1/2 inches wide x 9 1/2 long x 1 inch high and bake at 350 degrees about 35 minutes. Cool about 30 minutes. Slice into 1/2 inch slices and put on large wire rack (so they toast on both sides) for 10 minutes. Cool before storing.

Make some coffee, and invite me over!


Saturday, July 19, 2014

Grilled Chcken Asian Slaw #WhatAGrillWants


Grilling season....it really is a year 'round thing here in the South, but in the summer, you truly feel obligated.  A few weeks back I asked Mr. Preppy to grab some chlorine for the pool when he was out, and he came home with a Green Egg.  The ultimate man grill.  So I have been researching the cooking methods and recipes, and I have to say, I love this thing!  When OXO reached out about a summer promo, and one was What a Grill Wants, I knew this would be the perfect opportunity to whip up something yummy on my Big Green Egg.


OXO sent me a nice package with 5 items, and I was beyond excited.  I have been selling and using their products for years, but I didn't own any of these.  Tongs, yes.  But not these extra long tongs that are perfect for a hot grill.  Here's how I incorporated these tools and this delicious recipe.


Grilled Chicken Asian Slaw

Asian Croutons


Wonton Wrappers (I made 12 but there are a lot in a package.  Cook them up, they are delicious!)
Coconut Oil
Salt and Pepper

Preheat oven to 350 ̊F.  Brush the wontons using your OXO silicone basting brush with a little coconut oil and salt and pepper to taste.  (use z'tar and make chips for hummus....that's another blog).  Bake for about 6 minutes, but keep an eye on them, they crisp up in a hurry.  Cool and set aside.


TOOL TIP: The silicone brush is a must have in any kitchen.  I used boar bristle brushes for years, which eventually shed little hairs.  Silicone is heat resistant to 600˚, it doesn't trap odors, and you can toss it in the dishwasher for easy cleanup.  I used it to brush a glaze on the chicken while grilling as well.

Slaw Dressing

1/4 cup seasoned rice vinegar
1 T mayonnaise
1 T coarse dijon mustard
1 T sriracha
1/2 T soy sauce
1 teaspoon sesame oil
1 teaspoon fresh grated ginger
1 T sesame seeds, toasted

Mix all ingredients in a jar and emulsify well.  I was given a salad dressing jar by OXO, but it is a little small.  I usually double my dressing recipes, and I usually use a Mason Jar.  I can see that this little jar will come in handy, especially since it is leakproof, but not this time.  Set the dressing aside.


a small cast iron pan is ideal for toasting sesame seeds


Slaw with Grilled Chicken

6-8 boneless, skinless chicken thighs
2 T Asian marinade (I used a sauce that's been hanging in my fridge)
2 ears of fresh corn, shucked and rubbed with coconut oil
1/2 head of red cabbage, Shredded or thinly sliced
1/2 head of Napa cabbage. sliced thin, toss away the hard hearts
Fresh flat leaf parsley or cilantro, about 1/2 cup chopped
1 red bell pepper sliced thin
1 orange or yellow bell pepper sliced thin
3 scallions, cleaned and sliced


I prefer the lighter texture of Napa Cabbage over regular green cabbage

On a flat surface, I tenderized the chicken thighs with the OXO tenderizer.  Thighs aren't in need of actual tenderizing, but it acted almost like making them into paillards.  They flattened out, and I knew they would cook fast and even on the grill. Plus the little holes had to drink up the glaze.


TOOL TIP: I didn't own a meat tenderizer, but I will love using this one.  It has a lock feature, so no one will inadvertently stab themselves.  It comes apart for cleaning, and it did a great job on these thighs.


I lit my charcoal and let it turn white, and using my silicone brush, I brushed a little Asian glaze I had leftover in the fridge.  A sugar based glaze will make a nice char on the meat.  I used the tongs on the grill and they kept me a nice distance from the heat.  The chicken took about 5 minutes total, and the corn I just rolled every few minutes.  You can see the kernels turn a deep golden color as the heat does their thing.  The char marks are a bonus, and the smoky flavor of the corn is awesome!  I promise it cannot be achieved on a gas grill.  What have I been missing!?  Let the meat and the corn cool.


TOOL TIP: Tongs. You have to try them and you'll be sold.  I already own a few pairs of the OXO tongs in short version, about 9".  The tongs they sent me are 16'' and lock for easy storage.  They are so long, and great for grilling!


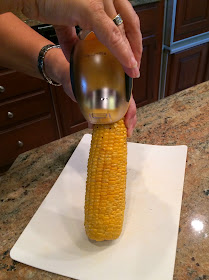
Place the other ingredients into a large bowl with room to toss.  You can add more cabbage as you need.  Slice the thighs thin and add to the bowl.  Using the corn stripper on a cutting board, slice the kernels off with the stripper.  Add to the salad.

TOOL TIP: The corn stripper is not new to me, but my version doesn't have a catcher for the kernels, and what a difference that makes.  The mess in minimized, and the tool strips all the way to the cob.  This one is a keeper.  I love a fresh corn salad, and this will make the process a breeze.


About an half hour prior to serving, toss the slaw with the dressing.  I serve the croutons in a basket along side the salad.  I like to use them as a scoop and eat the slaw right off that crispy wonton.

So, what are you waiting for?  Get out there and grill!